“Eat your greens” isn’t just something your mom yelled at you; in 2026, it’s a full-blown lifestyle revolution! Did you know that over 60% of home cooks now prioritize “bowl-style” meals for their balance of macros and ease of prep? I honestly used to think quinoa was just bland birdseed until I paired it with charred, crispy spring vegetables.
This Healthy Quinoa Bowl with Roasted Spring Greens is a game-changer that brings the garden straight to your fork! It’s vibrant, it’s earthy, and it’s about to become your new weeknight obsession.
 1")
Why Spring Greens are the Perfect Quinoa Companion
I’ve spent a lot of time trying to find the best way to eat healthy without feeling like I’m chewing on cardboard. For a long time, I just threw some steamed broccoli on a plate and called it a day. Honestly, it was pretty boring. But once I started mixing spring greens directly into my quinoa, everything changed for me. There is a real science behind why these two go so well together. It is about more than how pretty the green looks against the white grains. It is about how they help each other work better for your body. I’ve gotta say, once you try it this way, you won’t go back to plain grains.
The Health Magic of Iron and Vitamin C
One big reason I tell my students to eat their greens with grains is what I call the “absorption factor.” Quinoa is packed with iron, and that is great for your energy levels. But here is the catch: your body isn’t very good at soaking up that iron on its own. It needs a buddy to help out. Spring greens like spinach, kale, and even those little pea shoots are loaded with Vitamin C. When you eat them together, the Vitamin C helps your body grab that iron. It is like the greens are opening a door so the quinoa can nourish you better. I noticed a huge difference in my energy once I started being more intentional about this mix.
Balancing the Flavors
If you have ever eaten plain quinoa, you know it has an earthy, nutty taste. Some people find it a bit bland. But spring greens bring the “zing” that you really need. I love using mustard greens or rabe because they have a sharp, slightly bitter bite. That bitterness cuts through the richness of the quinoa and the oil you use for roasting. On the other hand, if you add fresh spring peas or tender asparagus, you get a hint of sweetness. This balance makes every bite different. You don’t get tired of eating it halfway through the bowl because your taste buds stay interested.
Why Texture Matters
Texture is why most people quit eating healthy meals. If everything is soft, it feels like baby food and nobody wants that. Quinoa is naturally fluffy and has a bit of a pop to it. When you add roasted spring greens, you get those crispy, charred edges. I love the contrast between a soft grain and a crunch from a roasted stalk of asparagus. It makes your brain think you are eating something much more exciting than a simple salad bowl. It feels substantial and fills you up without making you feel heavy or bloated.
 2")
Prepping the Perfect Fluffy Quinoa Base
I used to think quinoa was just… well, bad. I remember the first time I made it for my family. I followed the box exactly, but it came out tasting like a spoonful of wet dirt. I was so embarrassed! I almost threw the whole bag away. But as a teacher, I know that if a student fails, they usually just need a better method. So, I did some digging and realized I was skipping the most important parts. If you want that fluffy, light texture for your Healthy Quinoa Bowl with Roasted Spring Greens, you have to treat the grain with a little respect before it even hits the boiling water.
The Rinse Ritual
Don’t skip the rinse. I know, it’s an extra step and nobody likes extra dishes. But quinoa has this natural coating called saponins. It is basically the plant’s way of saying “don’t eat me.” If you don’t wash it off, your bowl will taste like soap and soil. I just put mine in a fine mesh strainer and run cold water over it for about two minutes. You will see the water start to get a bit bubbly—that’s the stuff you want to get rid of. I used to think I could skip this if the box said “pre-washed,” but doing it yourself always yields a better result.
Toasting for Texture
Once the grains are rinsed, I like to toss them in the pot without any water first. Use medium-high heat and keep stirring. You will start to hear a tiny “pop” and smell something like popcorn or toasted nuts. This is a total game changer. It helps the grain keep its shape so it doesn’t turn into mush later. I usually do this for about three or four minutes until it looks slightly golden. It adds a nutty depth that makes the roasted vegetables taste even better when you mix them in.
Getting the Ratios Right
Now, for the liquid. Most people just use water, but I think that is a missed opportunity. I always use a vegetable broth. The classic ratio is two cups of liquid for every one cup of quinoa. Bring it to a boil, then turn it down low and cover it. Don’t peek! If you keep lifting the lid, the steam escapes and the grains won’t cook evenly. Let it sit for 15 minutes, then turn off the heat and let it rest. This rest period is when the magic happens. Just fluff it with a fork and you are ready!
 3")
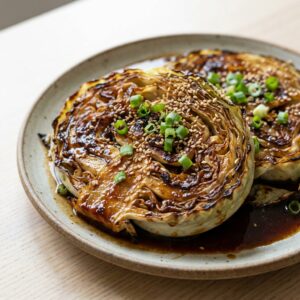
Master the Art of Roasting Spring Vegetables
I’ve gotta be real with you—I spent years absolutely ruining my veggies. I’d toss them in a pan, turn the heat way too low, and end up with a pile of grey, mushy sadness. It was honestly embarrassing, especially when I had friends over for dinner. I felt like I was failing at being a “foodie.” But then I learned the secret of high-heat roasting, and my Healthy Quinoa Bowl with Roasted Spring Greens finally tasted like something from a fancy cafe instead of a school cafeteria tray. Roasting is all about bringing out the sugar in the plants, and if you do it right, they become almost like candy.
High Heat is Your Best Friend
The first thing you need to do is crank that oven up to at least 425°F. Don’t be scared of the heat! If the oven is too cold, the vegetables just steam in their own juices instead of getting those crispy, caramelized edges we all crave. I once tried roasting asparagus at 350°F because I was worried about burning them, and they came out like wet noodles. Huge mistake. Use a good olive oil to coat everything evenly. You want them to glisten, but they shouldn’t be swimming in a lake of oil. A little salt and pepper right now is all you really need to make them pop.
Don’t Crowd the Baking Sheet
You also have to make sure you don’t crowd the pan. If your veggies are touching each other, they are going to get soggy. I usually spread my spring peas and asparagus spears out across two different baking sheets if I have to. Give them room to breathe! If they are all piled on top of each other, the steam gets trapped and you lose that crunch. Also, try to cut your vegetables into similar sizes so they all finish at the same time. I usually throw the thicker stems of the broccoli rabe in a few minutes before the delicate leaves so nothing gets overcooked.
Watching the Clock
Keep a close eye on them during the last five minutes. Things go from “perfectly charred” to “burnt charcoal” real fast. I usually set a timer for 10 minutes, then check every 2 minutes after that. When they come out, hit them with a bit of lemon juice while they’re still hot. This wakes up the flavor of the roasted vegetables like you wouldn’t believe. It makes the whole meal feel way more satisfying and professional. Even my pickiest friends ask for seconds when I roast them this way!
 4")
The “Liquid Gold” Dressing: Lemon-Tahini Drizzle
I’ve gotta be honest, for the longest time I thought the only way to get a creamy dressing was to use a ton of mayo or heavy cream. And as someone who tries to stay healthy, that didn’t really sit well with my stomach or my goals. I used to just buy those cheap bottled dressings from the grocery store, but they always had a weird metallic aftertaste and way too much sugar. Then I found this tahini recipe. I call it “Liquid Gold” because it literally transforms the whole Healthy Quinoa Bowl with Roasted Spring Greens into something you’d pay twenty bucks for at a fancy bistro. It is thick, rich, and feels like a total indulgence even though it is completely plant-based.
Creamy Without the Dairy
If you haven’t used tahini before, you’re in for a treat. It is basically just ground-up sesame seeds. It has this incredible texture that is almost like peanut butter but much more savory. I love using it because it gives you that luxurious mouthfeel without any milk or cream. One thing I learned the hard way: not all tahini is the same. Some are really bitter, so I usually look for one that looks smooth and light in the jar. When you mix it with water, it might look like it’s curdling or breaking at first. Don’t panic! Just keep whisking with a fork and it will suddenly turn into the smoothest, velvet-like sauce you’ve ever seen.
Balancing the Zest and Acid
The secret to a good drizzle is all about the balance. You have the heavy fat from the tahini, but you need acid to wake up the roasted vegetables. I always use fresh lemon juice. Please don’t use the stuff from the little plastic yellow bottle—it tastes like floor cleaner and will ruin your meal. I squeeze a whole lemon in there and add a splash of apple cider vinegar. If it tastes a bit too sharp or bitter, I add a tiny teaspoon of maple syrup. It doesn’t make it “sweet,” it just rounds out the edges. I find that this specific mix highlights the earthy taste of the quinoa perfectly.
Prepping in Bulk for Later
Since I’m a busy teacher, I don’t have time to make dressing every single day. I usually make a big mason jar of this on Sunday afternoon. It stays good in the fridge for about a week. One thing to know is that it will thicken up a lot when it gets cold—almost like a paste. When you’re ready to eat your bowl, just add a teaspoon of warm water and shake the jar really hard. It’ll be back to that perfect drizzling consistency in no time. Making this in advance is the only way I actually stick to my healthy eating during the work week!
 5")
Bringing it All Together for Your Table
So, there you have it! We have covered everything from getting that quinoa just right to roasting those spring greens until they have that perfect little crunch. I know it might seem like a lot of steps when you first read through it, but once you get into the rhythm of it, it actually goes by pretty fast. I usually have my quinoa simmering on the back burner while I am chopping up the asparagus and leeks. It feels good to move around the kitchen knowing that I am making something that is actually good for my body. I used to just grab a granola bar or a bag of chips for lunch, but I always felt like crashing by 3:00 PM. Since I started making this Healthy Quinoa Bowl with Roasted Spring Greens, I actually have enough energy to make it through my last period of classes without needing a third cup of coffee.
A New Way to Look at Lunch
Eating this way has really changed how I think about my “diet.” I don’t like that word much because it usually means you are giving something up. But with this bowl, I feel like I am adding so much color and flavor to my day. You have the fluffy grains, the charred greens, and that “Liquid Gold” dressing that just ties every single bite together. It is a meal that makes you feel full but not like you need to go take a nap right away. I have even started bringing extra containers of this to work because my fellow teachers kept asking what smelled so good in the breakroom. It is always a good sign when people are jealous of your vegetables!
Make It Your Own
The best part about this recipe is that it is just a starting point. If you find some other greens at the farmer’s market that look good, throw them in! I have tried this with sliced radishes and even some roasted carrots when I couldn’t find enough asparagus, and it still tasted great. The lemon-tahini dressing is really the star that makes everything work, so as long as you have that, you can’t really go wrong. I hope you give this a try this week and see how much better a fresh, homemade meal can make you feel. It is worth the small amount of effort to treat yourself to something this delicious.
Share the Love
If you end up making this bowl and loving it as much as I do, please save this post to your “Healthy Eats” or “Meal Prep” board on Pinterest! It really helps other people find these simple, healthy recipes, and I would love to see how your bowls turn out. There is nothing better than a community of people sharing good food and helping each other stay on track with their health goals. I’m already planning my next bowl for tomorrow, and I hope you are too. Happy roasting and enjoy every single bite of those spring flavors!