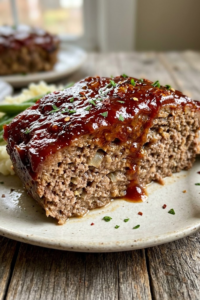
I once read a survey where nearly 70% of people said chocolate was their absolute favorite cake flavor for celebrations, and honestly, I’m right there with them! There is just something so nostalgic and comforting about a big slice of chocolatey goodness. For years, I struggled to find a moist chocolate birthday cake with rich buttercream frosting recipe that didn’t turn out like a dry sponge or a sugary mess.
But listen, I finally cracked the code! After dozens of flat cakes and runny frostings, I’ve perfected a method that yields a deep, dark cocoa flavor and a crumb so tender it practically melts. This isn’t just another dessert; it’s the centerpiece of your 2026 celebrations. Whether you are a baking pro or a total newbie, I’m going to help you make the best cake of your life.
 1")
Choosing High-Quality Cocoa Powder for Deep Flavor
When I first started baking for my students’ birthdays at school, I thought all cocoa powder was basically the same thing. Boy, was I wrong. I bought the cheapest tub at the grocery store, and my cake tasted more like cardboard than chocolate. If you want that deep, dark color and a taste that actually feels like real chocolate, you have to pick the right powder. This is truly the first step in making a moist chocolate birthday cake with rich buttercream frosting recipe that people will actually want to eat twice.
Natural vs. Dutch-Processed Cocoa
Most people just grab whatever brand is on sale, but there is a huge difference in how they act in your oven. Natural cocoa powder is very acidic. It’s what you usually see in the baking aisle in the classic brown tub. It works okay, but it can make your cake taste a bit sharp or even dry if you aren’t careful.
I always tell my friends to look for “Dutch-processed” or “alkalized” cocoa instead. This type has been treated to take away the acid. It turns the powder a beautiful, dark color that looks almost black. It also helps the chocolate flavor blend better with the other ingredients like sugar and butter. If you want your cake to look like those fancy ones you see in a bakery window, Dutch-process is the way to go. It makes a massive difference in the final look and how smooth the flavor feels on your tongue.
Check the Fat Content on the Label
Here is a little trick most people miss because they don’t read the fine print. Look at the back of the cocoa container before you buy it. You want to see how much fat is in there. Cheap cocoa is usually stripped of its natural oils to save money. This makes your cake crumbly and dry. High-quality cocoa has more cocoa butter left in it.
I look for cocoa that has at least 1 gram of fat for every 5 or 6 grams of powder. If the label says 0 grams of fat, put it back on the shelf! That extra fat is what keeps the cake moist even after it sits out on the party table for a few hours. It is like the difference between using whole milk and watery skim milk. You want that richness to stay inside the cake.
The Power of Sifting Your Cocoa
One last thing I learned the hard way after many lumpy batters: always sift your cocoa. Cocoa powder loves to stick together in little stubborn balls. If you just dump it in the bowl, those balls won’t break up when you stir. You’ll end up with a cake that has dry, bitter spots inside. I use a cheap mesh strainer and just shake it over my mixing bowl. It takes about thirty seconds, but it makes the batter so much smoother and helps the chocolate spread evenly through every single bite.
 2")
The Secret to a Moist and Tender Cake Crumb
There is nothing worse than cutting into a beautiful cake and finding out it is as dry as a desert. I remember my nephew’s birthday back in 2024. I made this huge three-layer cake, and it looked like a total masterpiece on the outside. But when we finally took a bite? We all needed a big gallon of milk just to swallow it. I felt so bad! Since then, I’ve spent a lot of time figuring out how to get that perfect “squish” in a moist chocolate birthday cake with rich buttercream frosting recipe. It isn’t just about luck; it is about how the ingredients work together while they bake.
Swap the Butter for Oil
Most people think butter is the king of the kitchen. And yeah, it tastes great on toast. But for a chocolate cake that stays soft for days, oil is actually your best friend. Butter is a solid when it gets cold, which can make your cake feel stiff or crumbly. Oil stays liquid even at room temperature, which means every slice stays tender and soft. I usually use a neutral oil like canola or vegetable oil so it doesn’t mess with the chocolate taste. If you really want that buttery flavor, you can always add plenty of it into the frosting later, but for the actual cake layers, stick to oil.
The Hot Coffee Trick You Have to Try
This is the one thing that always surprises my students in my baking club. Most recipes ask for a cup of water or milk at the end. I always swap that for a cup of hot, steaming coffee. You don’t have to be a coffee lover to do this! The heat from the liquid helps the cocoa powder dissolve and release all those hidden flavors. By the time the cake bakes, the coffee flavor is totally gone, but the chocolate taste is way stronger. It makes the batter look very thin and watery, which is scary at first, but you have to trust the process. It is the main reason the crumb ends up so silky.
Don’t Be a Mixing Maniac
I see people turn their stand mixers on high and just walk away for five minutes. Don’t do that! Once you add your flour to the wet ingredients, you need to be very gentle. If you mix it too much, you develop gluten. Gluten is great for chewy bread, but it is the enemy of a light birthday cake. I usually mix until I don’t see any white streaks of flour anymore, then I stop. Even if there are a few tiny lumps left, it is much better than having a tough, rubbery cake that no one wants to eat. Just be patient and keep it slow.
 3")
Mastering the Rich Buttercream Frosting
Let’s talk about the frosting. I messed this up so many times when I first started baking for my family. One time, it was so runny it literally slid off the cake like a slow-motion avalanche. My kid cried, and I felt like a total failure in the kitchen! It was a mess, but it taught me that temperature is the most important thing when you follow this moist chocolate birthday cake with rich buttercream frosting recipe. If your butter isn’t right, nothing else will be either.
The Secret to Perfect Butter Temperature
First off, your butter needs to be “room temperature,” but that doesn’t mean it should be melted or oily. If it is too greasy, your frosting won’t hold its shape when you try to pipe those pretty swirls. I usually take my sticks of butter out about two hours before I start. If you can press your thumb into the side and it leaves a little dent without sticking to your skin, you are in the clear. If it looks shiny, it is too warm. Throw it back in the fridge for ten minutes to firm up. You want it to be soft enough to whip but cold enough to stay strong.
Whipped to Perfection
I used to just dump all the sugar and butter together at once. That was a big mistake! Now, I beat the butter by itself for at least five full minutes. You want it to turn almost white and look very fluffy. This adds air, which makes the frosting light instead of feeling like a heavy brick of grease. I learned this trick from an old baking book I found at a garage sale years ago. When you finally add your powdered sugar, do it slowly. I usually add about one cup at a time. If you rush it, you’ll end up in a giant cloud of sugar dust that covers your whole kitchen. Cleaning sugar off the top of the fridge is not a fun way to spend a Saturday!
Adjusting the Texture and Taste
Also, I suggest using heavy cream instead of milk. It makes the texture way more stable for piping stars or borders on the edges. Sometimes my frosting looks a bit grainy, and that usually happens if I get lazy and don’t sift the cocoa powder. Sift it! It takes an extra minute but saves you the frustration of having “polka-dot” frosting. If the frosting tastes too sweet for you, just add a tiny pinch of salt. It cuts right through that sugar hit and makes the chocolate taste way better. This part of the cake is meant to be eaten and enjoyed, so keep tasting it until it’s just right.
 4")
Baking Essentials: Oven Temps and Pan Prep
I remember the first time I tried to bake a fancy cake for a graduation party. I followed every step of the moist chocolate birthday cake with rich buttercream frosting recipe perfectly, or so I thought. When the timer went off, I tried to flip the cake out of the pan and half of it stayed behind. It was a crumbly, jagged mess. I literally cried over that cake! Since that day, I’ve learned that how you prep your pans and watch your oven is just as important as the ingredients you use. If the foundation isn’t right, the whole thing falls apart.
The Magic of Parchment Paper
If there is one thing I tell my students to buy, it is a roll of parchment paper. Greasing the pan with butter and flour is a good start, but it isn’t a total guarantee. I like to trace the bottom of my cake pans on the paper and cut out perfect circles. After I grease the pan with a bit of oil or butter, I drop that paper circle right in the bottom. This means the cake will never, ever stick. It feels like a magic trick every time the cake just slides out perfectly onto the cooling rack. It saves so much stress and prevents those “cake-tastrophe” moments where you have to glue a broken layer back together with extra frosting.
Throw Away the Measuring Cups
In my early baking years, I just scooped flour out of the bag with a cup. But did you know that one person’s “cup” of flour can be way heavier than another person’s? If you pack the flour down, your cake will be dry and heavy. That is why I switched to using a digital kitchen scale. Measuring in grams is so much easier and more accurate. It is the best way to get consistent results every single time you bake. Once you start weighing your flour and sugar, you will never go back to those messy plastic cups again. It makes cleanup faster, too, because you have fewer dishes to wash!
The Toothpick Test and Beyond
Checking if the cake is done is more than just looking at the clock. Every oven is a little different—mine actually runs ten degrees hot! To see if it’s ready, I use a wooden toothpick. Stick it right in the center of the layer. If it comes out with just a few moist crumbs, it is perfect. If it’s wet, it needs more time. I also like to gently press the top of the cake with my finger. If the cake springs back up, it’s done. If your finger leaves a hole, let it bake for a few more minutes. Trusting the cake more than the timer is the mark of a true baker.
 5")
Assembly and Decoration for a Professional Look
I remember one time I was in a huge rush for a school party. I took the cakes out of the oven and they smelled so good I just couldn’t wait. I thought, “Hey, I can just frost them now and save some time before the kids get here.” That was a huge mistake. The frosting started melting immediately because the cake was still warm inside. It looked like a chocolate soup by the time I finished! That’s why assembly is the most stressful part of any moist chocolate birthday cake with rich buttercream frosting recipe. If you don’t take your time during this step, all that hard work you did with the oven just goes down the drain.
Patience is Your Best Friend
The biggest tip I can give you is to let your cakes cool completely. And I mean completely. I usually leave mine on the counter for an hour, and then I put the layers in the fridge for at least another hour. A cold cake is much easier to handle because the structure is more solid. It doesn’t crumble as much when you try to spread the frosting across the top. If you try to build a cake while it is even a little bit warm, the middle layer of frosting will get slippery and the top layer might slide right off. I’ve seen it happen at a family reunion, and it isn’t pretty!
The Crumb Coat Trick
Have you ever seen a cake where you can see little brown crumbs mixed into the pretty frosting? It looks kind of messy and “un-pro,” right? The secret to fixing that is something called a crumb coat. This is just a very thin layer of frosting that you spread over the whole cake. It acts like a sealer. It traps all those loose crumbs so they don’t ruin your final look. After you do the crumb coat, put the cake back in the fridge for twenty minutes. When you pull it out, the surface will be hard and smooth. Then, you can put on the thick, beautiful final layer of frosting without any crumbs getting in the way.
Keep the Decoration Simple for 2026
You don’t need to be a professional artist to make a cake look great in 2026. I like to use a simple offset spatula or even just the back of a large soup spoon. You can make pretty swirls just by moving the spoon in little circles while you turn the cake stand. If you have a spinning stand, it makes things even easier. I usually finish mine off with some chocolate shavings or some big, colorful sprinkles. It covers up any little bumps or mistakes you might have made with the spatula. Remember, it’s a birthday cake! It’s supposed to look fun and homemade, not like it came out of a factory machine.
 6")
This moist chocolate birthday cake with rich buttercream frosting recipe is truly the only one you will ever need. By focusing on quality cocoa and the right temperatures, you’ll create a dessert that people will talk about until 2027! I really hope you enjoy baking this as much as I enjoyed eating all the “mistakes” along the way. If you loved this guide, please save it and share it on Pinterest so others can find their new favorite cake!