Did you know that meatloaf is consistently ranked as one of the top five favorite comfort foods in America? I’ll be honest with you—for years, I thought meatloaf was just a boring, dry brick of meat that you ate because you had to. My first attempt back in the day was so tough you could have used it as a doorstop! But once I mastered this classic homemade meatloaf with brown sugar ketchup glaze recipe, everything changed. It’s juicy, sweet, tangy, and honestly feels like a warm hug on a plate. Whether you’re a pro in the kitchen or just trying to feed some hungry kids after a long day of teaching, this recipe is going to be your new best friend.
 1")
Picking the Right Meat Mix
When I first started making dinner for my family, I thought ground beef was just ground beef. I’d walk into the grocery store and grab the cheapest pack or the one that looked the “healthiest” because it had the least amount of fat. Man, was that a mistake. My early meatloafs were so dry and crumbly that my kids would try to hide pieces of it under their mashed potatoes so they wouldn’t have to chew it. Getting the meat right is the most important step if you want a slice that actually stays together and tastes good.
The Magic of 80/20 Ground Beef
If you want a juicy result, you have to look at the fat ratio. I always tell people to look for the “80/20” label on the package. This means it is 80% lean meat and 20% fat. That 20% might seem like a lot if you are watching your diet, but most of it cooks off in the oven anyway. What stays behind is what makes the meatloaf moist. If you go with 90% or 93% lean beef, your meatloaf is going to turn out like a literal brick. I learned this the hard way after a few very sad Tuesday night dinners. The fat acts like a lubricant between the meat fibers, keeping everything tender while it bakes.
Why I Add Ground Pork
Another trick I learned from an old neighbor is using a mix of meats. Instead of just using two pounds of beef, I use about a pound and a half of beef and half a pound of ground pork. Pork has a different kind of fat and a softer texture than beef. When you mix them, the pork helps “loosen” the loaf so it isn’t so dense. Some stores even sell a “meatloaf mix” which is usually beef, pork, and sometimes veal. If you see that, grab it! It makes a huge difference in how the final product feels in your mouth.
Handle the Meat with Care
The biggest mistake I see people make is overworking the mixture. You aren’t kneading bread dough here. If you squeeze the meat too hard or mix it for too long, you pack the protein fibers together too tightly. This makes the meatloaf tough and rubbery. I like to use my hands and just gently toss everything together until it’s just combined. You want it to stay a bit loose before it goes into the oven. It’s okay if it feels a little messy; that’s just part of the process of making good food. Keep it light, keep it fatty, and your family will actually finish their plates for once.
 2")
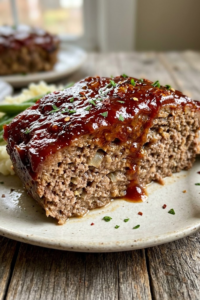
The Secret is in the Brown Sugar Glaze
I’ve learned that a good glaze can save almost any meal. For a long time, I just used plain old ketchup. It was fine, but it didn’t have that “wow” factor. When I started making this classic homemade meatloaf with brown sugar ketchup glaze recipe, I realized that the topping is what people talk about the most. It turns into this sticky, sweet, and slightly tangy crust that makes the meat taste way better. If you skip this part, you’re just eating a big burger in a loaf shape.
What Goes Into the Mix?
You might think you just need sugar and ketchup, but there’s a little more to it. I like to use about half a cup of ketchup and a few tablespoons of packed brown sugar. But the real trick is adding a teaspoon of dry mustard and a tiny splash of vinegar. The vinegar cuts through the sweetness so it isn’t like eating candy on your meat. I usually mix it in a small bowl while the meat is getting ready. Don’t worry about being too perfect with the measurements. A little more sugar makes it sweeter, and a little more mustard gives it a zing. I’ve tried using honey before, but it gets too runny. Brown sugar is definitely the way to go because it stays thick and sticky.
The Double-Glaze Trick
Here is a secret I tell my friends: don’t just put the glaze on once. I like to spread about half of the mixture on top before the loaf goes into the oven. This first layer starts to bake into the meat. Then, about 15 minutes before the timer goes off, I pull the pan out and brush on the rest. This creates a thick, glossy layer that looks like it came from a fancy restaurant. It also helps make sure the meat stays moist while it finishes cooking.
Keep an Eye on the Heat
Because there is a lot of sugar in this glaze, it can burn if you aren’t careful. If your oven has hot spots, the edges of the glaze might get too dark. If you see it turning black instead of a deep red, you can loosely tent some foil over the top. This protects the sugar while the middle of the meat finishes reaching the right temperature. Just don’t let the foil touch the glaze, or it will pull all that goodness right off when you lift it!
 3")
Baking Tips for the Perfect Slice
I’ve spent a lot of years in the classroom, and if there is one thing I tell my students, it’s that you can’t rush the process. The same thing goes for this classic homemade meatloaf with brown sugar ketchup glaze recipe. You’ve done all the hard work of mixing and glazing, but the baking part is where people usually get impatient. I used to just stick the pan in and hope for the best, but I’ve learned a few tricks that make sure every slice is perfect and doesn’t just fall apart on the plate. It’s about being patient and using the right tools for the job.
Forget the Deep Loaf Pan
When I first started out, I always used those deep glass loaf pans. I thought that’s what you had to do because of the name! But I realized that the meatloaf just sits in its own grease and basically boils in it. It gets mushy on the bottom and the sides never get that nice crust we all love. Now, I just line a regular baking sheet with some parchment paper and shape the meat into a loaf with my hands. This lets the hot air hit all sides of the meat. Plus, the glaze can drip down the sides and get all sticky and delicious. It’s way better than having a soggy bottom, believe me. It also makes it easier to drain off any extra fat if you need to.
Use a Meat Thermometer
One of the biggest questions I get is how long to cook it. Every oven is a little different—mine runs a bit hot, and my neighbor’s runs cold. Instead of just guessing and hoping it’s not raw in the middle, I always use a meat thermometer. You want the internal temperature to hit 160 degrees. If you take it out too early, it’s a safety issue. If you leave it in too long, it gets dry and tough like a piece of old leather. Just poke the thermometer into the thickest part of the loaf about 45 minutes in. It takes all the stress out of wondering if dinner is actually ready to eat.
The Ten-Minute Resting Rule
This is the hardest rule to follow, especially when the whole house smells like sweet ketchup and savory beef. You have to let the meatloaf rest for at least ten minutes before you even think about grabbing a knife. If you cut it right away, all those juices you worked so hard to keep inside will just run out all over the cutting board. Then you’re left with dry meat that tastes like cardboard. When it sits, the juices settle back into the meat. It also helps the loaf firm up so you get those nice, clean slices that look good for your family. Don’t skip this part! It’s the difference between a great meal and a messy pile of meat on a plate.
 4")
Your Turn to Bake!
I really hope you feel ready to get into the kitchen and try this classic homemade meatloaf with brown sugar ketchup glaze recipe. Cooking for people you love is one of the best things you can do, and this dish is the perfect way to show you care without spending all day over a hot stove. It’s funny how a simple mixture of meat, crumbs, and sugar can turn into such a famous comfort food. I’ve seen my students get so excited about things they’ve made with their own hands, and I think adults feel that same way when a meal turns out just right. This recipe isn’t about being fancy or using tools you can’t afford; it’s about taking basic things from your pantry and making them taste like home.
When you sit down to eat, remember the big things we talked about. Use that 80/20 beef so it stays juicy. Don’t forget to let that glaze get sticky and dark in the oven. And please, for the sake of your dinner, let the loaf rest on the counter before you start cutting into it! These small steps are what make the difference between a meal people eat because they have to and a meal people ask for every single week. My kids still ask for “the sticky meat” almost every Sunday, and I never get tired of making it for them because I know it’s going to be a hit.
If you have any leftovers, you are in for a real treat. Cold meatloaf sandwiches with a little bit of extra mayo and a piece of crisp lettuce are honestly just as good as the fresh dinner. I usually make a double batch just to make sure we have enough for lunch the next day. It’s a great way to save money and stay full during a busy work week. Even when life gets a bit messy or the day at school is long, knowing there is a good meal waiting in the fridge makes things a little bit easier.
I would love to hear how your meatloaf turns out! If you enjoy this recipe and think it’s as tasty as I do, please share this recipe on Pinterest so your friends and family can find it too. Sharing is a great way to help others discover how easy and fun home cooking can be. Go ahead and get your oven preheated—you’ve got this! Happy baking, and I hope every bite is exactly what you were looking for today.