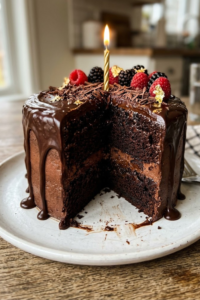
“All you need is love. But a little chocolate now and then doesn’t hurt,” said Charles M. Schulz, and boy, was he right! I remember the first time I tried to make a chocolate birthday cake with ganache drip and soft layers recipe for my brother’s big 4-0. It was a total disaster! The layers were as dry as a desert, and the ganache looked more like a swamp than a “drip.” I almost cried right over the mixing bowl. But honestly, those mess-ups taught me more than any fancy cooking school ever could.
Now, I’ve finally cracked the code to getting that velvet-soft texture every single time. It’s all about the moisture and not overworking the batter like it’s a piece of bread dough. If you’ve ever felt scared of that “drip” look, don’t worry. I’m going to show you how to nail it without pulling your hair out. We are going to make a cake that people will talk about for years!
 1")
The Secret to Those Ultra Soft Cake Layers
Listen, nobody wants to bite into a birthday cake and feel like they are chewing on a piece of dry cardboard. I’ve seen it happen way too many times at school parties and family get-togethers. For a long time, I actually thought I just wasn’t “born” to bake. I figured some people had the magic touch and I just had the “dry cake” curse. But then I realized that getting those velvet-soft layers is actually more about science than luck. It’s about how you treat your ingredients before they even hit the oven. I’m gonna share what I’ve learned over the years so you don’t make the same mistakes I did back in the day.
Why Room Temperature Ingredients Matter
One of the biggest mistakes I used to make was pulling eggs and milk straight from the fridge and tossing them in the bowl. Here is the deal: if your ingredients are cold, they won’t emulsify. That’s just a fancy word for mixing together smoothly. Cold eggs will make your batter look curdled, and that leads to a weird, uneven texture after baking. I always tell my friends to set everything out on the counter at least an hour before you start. When everything is at the same temperature, they trap air better, which helps the cake rise and stay fluffy. It’s a small step, but it makes a massive difference in how the cake feels in your mouth.
The Magic Duo: Oil and Buttermilk
A lot of people think butter is the only way to go for flavor, but for a truly soft chocolate cake, oil is your best friend. Butter is great, but it stays solid at room temperature, which can make a cake feel a bit stiff. Vegetable oil stays liquid, so the cake stays moist for days. To get the best of both worlds, I use a mix. Then there is the buttermilk. The acid in buttermilk reacts with the baking soda to create tiny bubbles, but it also helps break down the gluten in the flour. This keeps the cake from getting tough. If you don’t have buttermilk, just add a splash of lemon juice to regular milk and let it sit. It works like a charm.
Blooming Your Cocoa with Hot Coffee
This is my favorite “teacher secret.” Instead of just tossing the cocoa powder in with the flour, you should “bloom” it. I take my cocoa and mix it with a cup of very hot, strong coffee. The heat wakes up the chocolate flavor and makes it way more intense. Don’t worry, your cake won’t taste like a latte! The coffee just makes the chocolate taste more like… well, chocolate. Plus, adding that extra liquid is another way we keep the crumb from getting dry.
Whatever You Do, Don’t Overmix
Once you add your dry ingredients to the wet ones, you have to be real careful. I see people use a high-speed mixer and just go to town on the batter. That is a huge no-no. When you mix flour too much, you develop gluten, which is great for bread but terrible for cake. It turns your soft layers into something rubbery. I always switch to a spatula at the end and just fold it gently. Stop as soon as you don’t see any more white streaks of flour. Your patience will be rewarded with a cake that basically melts when you eat it.
 2")
Making the Perfect Ganache Drip Without the Stress
Making the drip is the part that makes everyone nervous. I totally get it. I’ve had chocolate run right off the cake and pool on the cardboard base before, making a huge sticky mess. It looks so fancy on those baking shows, but doing it in your own kitchen feels like a high-stakes science project. But honestly, once you get the feel for it, you’ll want to drip chocolate on everything you bake. It’s the best way to hide a messy frosting job too!
The 1:1 Ratio Rule
The first thing you need to know is the ratio. For a good drip on a chocolate birthday cake with ganache drip and soft layers recipe, you want equal parts by weight. I usually use about 4 ounces of bittersweet chocolate and 4 ounces of heavy cream. Don’t use milk chocolate here because it’s got too much sugar and won’t set up right. It’ll just stay runny and sad. Chop your chocolate into really tiny pieces—the smaller the better. If the chunks are too big, they won’t melt all the way and you’ll have lumps. Lumpy ganache is a nightmare when you’re trying to get a smooth look.
Patience is the Secret Ingredient
Heat your cream in a small pot until it just starts to simmer around the edges. Don’t let it go into a full boil or you might burn the chocolate. Pour it over your chopped chocolate and then—this is the hard part—don’t touch it. Walk away for five minutes. If you stir it right away, the chocolate cools down too fast and gets grainy. After five minutes, stir it slowly from the center outward. It’ll look like a mess at first, but suddenly it turns into this beautiful, glossy liquid gold. Now, you have to let it sit again. If you pour it while it’s hot, it’ll melt your frosting. It needs to be slightly warm to the touch, like a baby’s bath water.
The Cold Cake and the Test Run
Here is my best trick: make sure your cake is cold. I put mine in the fridge for at least thirty minutes before I start the drip. When the warm ganache hits the cold frosting, it slows down and stops exactly where you want it. Before you commit to the cake, try a “test drip” on an upside-down glass. If it runs all the way to the bottom, the ganache is too hot. If it stops immediately, it’s too cold. I like using a squeeze bottle for the actual cake because it gives you way more control than a spoon. Just go around the edges first, then fill in the top. It’s way easier than it looks!
 3")
Assembly: How to Crumb Coat Like a Pro
So, you’ve got your soft layers and your glossy ganache ready to go. Now comes the part that used to give me actual nightmares—putting it all together. I remember making a cake for a retirement party once. I didn’t level the layers, and by the time we got to the party, the top half was sliding off like a slow-motion car crash. It was pretty embarrassing, but hey, we still ate it! The key to a great chocolate birthday cake with ganache drip and soft layers recipe is a solid foundation. You can’t just stack ’em and hope for the best. You have to be a little bit of a builder here.
Leveling the Playing Field
Before you even touch the frosting, look at your cake layers. Most cakes bake up with a little dome on top. If you stack those domes, your cake is gonna be wobbly and prone to tipping. I take a long serrated knife—like a bread knife—and gently saw off that top bump. Don’t throw those scraps away, though! My kids usually hover around the kitchen like vultures waiting for those “cake tops.” Once the layers are flat, your cake will sit nice and straight. It makes the whole process way less stressful and helps the filling stay right where it belongs.
The Magic of the Crumb Coat
This is the part most beginners skip because they are in a hurry. A crumb coat is just a very thin layer of frosting that covers the whole cake. Think of it like primer before you paint a room. It traps all those little loose chocolate crumbs so they don’t get mixed into your final, pretty layer of frosting. I just slap a little bit on, smooth it out with my spatula, and it doesn’t even have to look good. It’s supposed to look a bit messy! It keeps the final look clean and professional.
Chilling Out Before the Big Drip
After the crumb coat is on, put that cake in the fridge for about twenty minutes. This sets the frosting so it doesn’t move when you put the final layer on. Once the final layer is smooth, back into the fridge it goes again. You want that cake surface cold before you do the ganache drip. If the cake is warm, the ganache will just melt the buttercream and you’ll have a chocolate puddle. Cold cake equals a perfect, controlled drip every single time.
Adding Your Personal Flair
Once your drip is done, you can add the fun stuff. I like to throw on some sprinkles or maybe some fresh strawberries on top while the ganache is still a little bit tacky. It makes the cake look like it came from a fancy bakery, but we know it just took a little bit of patience and some cold fridge time. Don’t worry if it’s not perfect; the people eating it are just going to be happy there is chocolate!
 4")
Time to Celebrate!
When you finally finish this cake, you are going to feel like a total rockstar. I know I did the first time the drip actually worked! There is something so satisfying about seeing those chocolate streaks stay right where they are supposed to be. It’s not just about the food; it’s about the look on someone’s face when you bring it out with the candles lit. My nephew still talks about the one I made him three years ago, even though I accidentally used way too much salt in the frosting. Okay, maybe try to avoid that, but you get what I mean. People remember the effort and the love you put into it more than they remember a perfectly straight edge.
If you have leftovers—which is pretty rare at my house—make sure you keep it in an airtight container. Because we used oil and buttermilk, this cake stays moist for a few days, but the fridge can dry it out if it isn’t covered up tight. I usually just put a piece of plastic wrap right against the cut sides of the cake. It keeps the air from getting in there and ruining that soft crumb we worked so hard on. It’s also a good idea to let the cake sit on the counter for about twenty minutes before eating it if it’s been in the fridge. Chocolate cake always tastes better when it isn’t ice cold.
Let’s talk about the big moment: the slicing. When you go to cut this cake, use a big knife dipped in hot water. Wipe it dry between every single slice. This keeps the ganache from smearing all over the place and makes those layers look super sharp on the plate. It’s one of those little things that makes people think you’re a professional pastry chef, even if you still have flour on your forehead. I remember the first time I did that trick, my sister-in-law asked if I bought the cake at that fancy place downtown. I just smiled and didn’t say a word!
I really hope this chocolate birthday cake with ganache drip and soft layers recipe helps you make someone’s day special. If you tried it and loved it, or even if you had a “nail fail” moment, I’d love to hear about it! Please make sure to save this recipe to your “Dessert Goals” or “Birthday Ideas” board on Pinterest so other home bakers can find these tips too. Sharing is caring, and it helps me keep sharing these stories with you all. Happy baking, and I hope your next party is the best one yet!