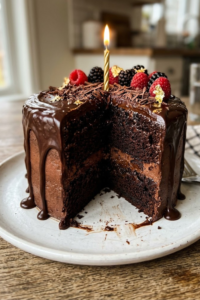
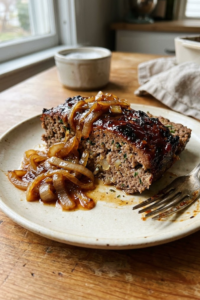
“A house is not a home without the smell of meatloaf in the oven.” I don’t know who said that, but they were definitely onto something! Honestly, I spent years running away from meatloaf because it was always so dry and tasteless. It felt like eating a flavored brick. But then I discovered this bbq glazed meatloaf with caramelized onions juicy homemade recipe and everything changed in my kitchen.
In 2026, we’re all looking for that perfect balance of sweet, savory, and tender. This isn’t your grandma’s mystery meat. It’s a flavor bomb packed with umami and topped with a sticky, tangy glaze that will make your kids ask for seconds. Let’s dive into how to make the juiciest loaf you’ve ever tasted!

Why Caramelized Onions are the Secret to a Juicy Meatloaf
I’m gonna be totally real with you guys. My first attempt at a bbq glazed meatloaf with caramelized onions juicy homemade recipe was a total disaster. I thought I could just toss raw, crunchy onions into the meat and call it a day. Man, was I wrong! The onions stayed hard and the meat ended up tasting like a soggy onion salad. It was honestly pretty gross and my husband barely finished his plate. I felt like I failed a basic cooking test, and as a teacher, that really bothered me! I had to go back to the drawing board to figure out how the pros actually do it.
Cooking Out the Extra Water
Since I teach for a living, I had to look into the science of why my kitchen experiment failed. The big secret is all about the water inside the onions. Raw onions release way too much liquid while they cook inside the meatloaf. This usually makes the whole thing fall apart when you try to slice it or makes it feel greasy. When you caramelize them first in a pan with some butter or oil, you cook off that extra liquid. This leaves you with nothing but pure, sweet goodness that doesn’t mess with the meat’s structure. It’s a simple step, but it changes everything about how the loaf holds together.
Low and Slow for the Win
It takes about 20 minutes on medium-low heat to get the onions right. Don’t try to rush it! I once tried to crank up the stove heat to save time and I just ended up with burnt, bitter bits that ruined the whole meal. Use a splash of beef broth or even water if the pan gets too dry while you’re stirring. That little trick helps you scrape up all the brown bits from the bottom of the pan. Those bits are where the real flavor lives, and they make your beef taste way better than any boxed mix ever could.
Better Texture and Moisture
Once your onions are soft and brown, let them cool down for a bit. If you throw hot onions into raw meat, you start cooking the beef too early. That’s a big mistake. I usually put mine on a plate in the fridge for five or ten minutes while I get the breadcrumbs and eggs ready. When you finally mix these jammy onions into your meatloaf, they basically melt into the background. They act like little sponges that hold onto the fat from the beef. This is why the bbq glazed meatloaf with caramelized onions juicy homemade recipe stays so moist. Your fork will just slide right through the slice without it crumbling into a million pieces.

Choosing the Best Meat Blend for Maximum Flavor
I used to be one of those people who always bought the leanest ground beef at the grocery store. I thought I was being smart and healthy, but my dinners were suffering because of it. If you want this bbq glazed meatloaf with caramelized onions juicy homemade recipe to actually taste like something from a restaurant, you have to stop buying the 90/10 beef. Trust me, I learned this the hard way after many dry, crumbly meals that tasted like cardboard. My kids used to call it “the brown brick” before I figured out the right meat to buy.
Why Fat is Your Best Friend
When you go to the meat counter, look for the package that says 80/20. This means it has 20 percent fat. I know that sounds like a lot, but you need that fat to keep the meatloaf moist while it sits in the oven for an hour. If you use meat that is too lean, all the moisture evaporates and you are left with a brick. The fat also helps carry the flavor of the onions and the BBQ glaze through every single bite. In my classroom, I tell my students that fat is like a conductor for flavor, and meatloaf is the perfect example of that in action.
Mixing Different Kinds of Meat
Another trick I found is using more than just beef. Most grocery stores sell something called a “meatloaf mix” which is usually a blend of beef, pork, and sometimes veal. If you can’t find that, just buy a pound of ground beef and a half-pound of ground pork. Pork has a different kind of fat and a milder flavor that balances out the heavy beef taste. It makes the texture way softer too. I started doing this a few years ago and I never went back to using just plain beef. It is one of those small changes that makes a massive difference in the final result.
Don’t Overwork the Mix
One big mistake I see people make is mixing the meat way too much. I tell my friends to treat the meat like pie crust dough. If you squish it and squeeze it through your fingers too much, the proteins get all tight and tough. You want to use your hands like a rake and just gently toss everything together until it is just barely combined. This keeps little air pockets inside the loaf which hold onto the juices. If you pack it too tight, the juice has nowhere to go but out onto the baking pan, leaving you with a dry dinner. Keep it light and loose for the best results!

Crafting the Ultimate Tangy BBQ Glaze
If you ask me, the glaze is the part that turns a regular dinner into something everyone fights over at the table. You can have the best meat mixture in the world, but if the topping is boring, the whole bbq glazed meatloaf with caramelized onions juicy homemade recipe just feels unfinished. I used to just squirt some plain ketchup on top because I was tired after a long day at school. It was okay, but it didn’t have that “wow” factor that makes people ask for the recipe. Once I started making my own quick sauce, there was no going back. It gets all sticky and caramelized in the oven, which is basically the best part of the whole meal. My kids always try to steal the end pieces because they have the most glaze on them!
Getting the Right Balance
The base of a great glaze is usually ketchup, but you really can’t stop there. If it’s too sweet, it tastes like candy. If it’s too sour, it overpowers the beef. I like to mix my ketchup with a bit of brown sugar and some apple cider vinegar. The sugar helps it get that shiny, tacky look that looks so good in photos. The vinegar cuts through the heaviness of the meat and the onions. I usually throw in a little bit of yellow mustard too. It adds a tiny bit of zing that you can’t quite put your finger on, but you’d miss it if it wasn’t there. It’s all about hitting those different taste buds at once.
A Little Smoke Goes a Long Way
Since this is a BBQ style loaf, you want a bit of that outdoor grill flavor even if you’re cooking in a regular kitchen. I usually add a tiny drop of liquid smoke to the bowl. Be careful with that stuff, though! If you put too much, it tastes like a campfire. Just a few drops is plenty. If you don’t have that, a teaspoon of smoked paprika works great too. It gives the glaze a deep red color that looks amazing when it comes out of the oven. My husband likes it a bit spicy, so sometimes I’ll even add a pinch of cayenne or some chopped chipotles to give it a kick.
The Two-Step Glazing Method
One thing I learned the hard way is that you shouldn’t put all the sauce on at the very beginning. If the sugar sits in the heat for an hour, it might burn and turn black. I like to put a thin layer on before it goes in, and then save the rest for the last 15 minutes of baking. This creates a thick, jammy layer that sticks to the meat instead of just running off into the pan. It makes the bbq glazed meatloaf with caramelized onions juicy homemade recipe look like it belongs on a magazine cover. Plus, it smells incredible while it bubbles away in the heat! I always make extra sauce to serve on the side for dipping.

Step-by-Step Guide to Baking and Resting
After all that work with the onions and the mixing, the last thing you want is to mess up the actual cooking part. I’ve seen so many people do the prep perfectly and then just throw the loaf in a scorching hot oven and walk away. That’s a huge mistake! I used to do that too, especially on nights when I had a giant stack of papers to grade and just wanted dinner to be over with. I’d crank the heat to 425 thinking it would cook faster. It did cook faster, but the outside was burnt and the inside was still basically raw meat. Talk about a dinner disaster! Now I follow a much better routine that makes sure the meal turns out great every single time.
Finding the Right Temperature
I’ve found that 350 degrees is the absolute sweet spot for baking. At this temperature, the meat cooks through evenly without the edges getting dry or crusty before the middle is done. It usually takes about an hour depending on how thick you shaped your loaf. I always tell my students that patience is a virtue, and that definitely applies to your kitchen too. If you rush the heat, you lose all those juices we worked so hard to keep inside with the caramelized onions. Just set the timer, grab a snack, and let the oven do its job.
The Magic Number is 160
Stop guessing if the meat is done by poking it with a fork. I used to do that and I’d end up with a crumbly mess and no real answer. Go buy a cheap digital meat thermometer. It’s the best ten dollars you’ll ever spend. You want to pull the meatloaf out of the oven when the middle reaches exactly 160 degrees. If you go much higher than that, the beef starts to get tough and rubbery. I check mine around the 45-minute mark just to see where it’s at. This is the only way to make sure your bbq glazed meatloaf with caramelized onions juicy homemade recipe is actually perfect and safe to eat.
Why You Must Wait to Slice
This is the hardest part of the whole process. When that amazing smell fills your house, you’re going to want to cut a piece immediately. Don’t do it! You have to let the loaf rest for at least 10 minutes on the counter. If you cut it right away, all the juice runs out onto the board and your meat turns dry instantly. While it sits, the juices move back into the center of the meat. I usually use this time to finish up the mashed potatoes or finally set the table. Trust me, those ten minutes make a world of difference for the texture.

Bringing it All Together for the Perfect Family Meal
So, there you have it! My whole strategy for making the best dinner on the block. I honestly think meatloaf gets a bad rap because of those old school cafeteria lunches we all had to eat as kids. You know the ones—that gray, spongy square with the weird red sauce? Yeah, this bbq glazed meatloaf with caramelized onions juicy homemade recipe is nothing like that. It’s the kind of meal that makes your house smell like a real home the second you walk through the door after a long day at work. Even after a rough day of teaching middle schoolers, seeing this in the oven makes me feel like I’ve got my life together. It’s just simple, honest food that tastes amazing.
The Magic of Leftovers
One of the biggest things I tell my friends is that the leftovers are actually better than the first night. I’m totally serious about that! The flavors have more time to sit together in the fridge and really get to know each other. I love taking a thick slice of cold meatloaf and putting it on some white bread with a little extra mayo and mustard for my lunch at school the next day. It’s way better than any sandwich I could buy at the deli. If you want to reheat it for dinner, don’t just zap it in the microwave. It gets kind of rubbery if you do that. Instead, try heating up a little butter in a pan and frying the slice for a minute on each side. It gets those crispy edges back and stays super juicy inside.
Freezing for Busy Weeknights
Sometimes people ask me if they can freeze this. Absolutely! I often make a double batch on Sundays when I have some free time. I bake one for dinner and freeze the other one raw in a loaf shape. Just wrap it really tight in plastic wrap and then some foil so it doesn’t get freezer burn. When you’re ready to eat it, let it thaw in the fridge overnight before you bake it like normal. It’s a total lifesaver for those weeks when I’m bogged down with parent-teacher conferences and have zero time to chop onions or mix meat.
Having a homemade meal ready to go in the freezer is so much better than ordering pizza for the third time in a row. It’s those little time-saving tricks that keep us sane, right? If you tried this and loved it, I’d really appreciate it if you could share it on Pinterest. It helps other home cooks find recipes that actually work, and it helps me keep sharing these stories with you guys. Cooking shouldn’t be scary or hard. It should be about making something tasty that brings your family to the table without a fight. This recipe does exactly that every time I make it. I hope your family loves it just as much as mine does! Happy cooking, everyone—now go get those onions sizzling!