Let’s be real for a second. We all remember that scene with Bruce Bogtrotter in Matilda, right? The sweat, the pressure, and that massive, glistening chocolate cake. As a kid, I was horrified. But now? I wake up dreaming about that Matildas chocolate cake.
I spent way too long trying to get this right. Most recipes came out dry as a bone—total disasters. I even cried over a sunken layer last Tuesday (don’t ask). But I finally cracked the code. This isn’t just a dessert; it’s a fudgy, rich experience that demands a tall glass of milk. It’s dense, dark, and honestly? It’s the best mistake I ever made in the kitchen.

Why This Matildas Chocolate Cake is Worth the Hype
I used to think that all chocolate cakes were basically the same. I was wrong. I was so, so wrong. Growing up, the Bruce Bogtrotter cake scene in Matilda was etched into my brain. It looked so rich and sticky that I could almost smell it through the TV screen.
For years, I chased that specific texture. I wanted a Matildas chocolate cake that didn’t just look the part but actually tasted like pure indulgence. Most recipes I tried were fluff. They were airy, dry sponges that needed a gallon of milk just to wash down.
I remember baking a “famous” chocolate mud cake recipe for my sister’s graduation a few years back. It looked great on the counter. But when we cut into it? It crumbled like sawdust. It was humiliating. I ended up covering the slices in extra ice cream just to hide the dryness. I learned the hard way that not all recipes are created equal.
It’s All About the Texture
So, what makes this one different? It’s the density. This isn’t your standard birthday sponge. It is heavy. When you lift the pan, it should feel like a brick.
The crumb is tight and incredibly damp. That sounds gross, I know, but “damp” is the holy grail of baking. It sticks to your fork. It sticks to your teeth. It is the kind of moist chocolate cake recipe that you eat one slice of and feel full for three hours.
I realized that achieving this texture isn’t about fancy equipment. It’s about ignoring the urge to make it “light.” We don’t want light here. We want fudge. We want a cake that feels like it’s barely cooked in the middle, even though it is.
Surprisingly Forgiving to Make
Here is the thing that really gets me: people think Roald Dahl recipes like this are hard. They look at that glossy ganache and think, “I can’t do that.” But honestly? This is one of the easiest cakes I’ve ever made.
You don’t even need a mixer if you don’t want one. I’ve made this batter with a wooden spoon and a lot of aggression on a bad Tuesday. It actually turned out better that way because I didn’t overwork the flour.
The only real danger is baking it too long. I have a bad habit of getting distracted by my phone and leaving things in the oven an extra five minutes. Don’t do that. Watch it like a hawk. If you pull it out when it’s still a little wobbly, you’re golden. Trust me, nobody ever complained about a cake being too fudgy.

Essential Ingredients for the Richest Crumb
Listen, I’m going to be honest with you. You cannot skimp on the ingredients for this recipe. I tried to make a budget version of this Matildas chocolate cake once using generic cocoa and 2% milk. It was a tragedy. It tasted like a sad muffin. If you want that Bruce Bogtrotter cake experience, you have to commit to the good stuff.
This isn’t just about dumping things in a bowl. It’s about chemistry. And I barely passed high school chemistry, so if I can get this, you can too.
The Cocoa Dilemma
First up, let’s talk about the powder. Do not use the light brown sugary stuff you put in milk for kids. That won’t work here. You need Dutch process cocoa.
I didn’t know the difference until I was about 30. I used natural cocoa for years and wondered why my cakes were reddish-brown instead of jet black. Dutch-processed cocoa has been treated to reduce acidity. It’s darker, smoother, and gives you that deep, intense color.
I once couldn’t find it and used regular cocoa. The cake was fine, but it lacked that dramatic, gothic look. It just looked like a regular birthday cake. Boring. If you want the “wow” factor, hunt down the Dutch stuff.
The Secret Liquid Weapon
Okay, don’t panic. You need to put hot coffee in cake batters like this.
I can hear you screaming, “But I hate coffee!” Relax. You won’t taste it. I promise. My husband hates coffee—he thinks it tastes like burnt dirt—and he eats three slices of this cake.
The hot liquid does something magical called “blooming” the cocoa. It wakes up the chocolate flavor. It makes the chocolate taste more like chocolate. If you are absolutely against it, you can use boiling water. But you’re missing out. I used cold coffee once because I was lazy and didn’t want to boil the kettle. The batter was lumpy. It was a mess. The heat is non-negotiable.
Why Buttermilk Matters
Next is the fat and the acid. We use oil, not butter, for the cake sponge. Butter contains water, which evaporates and dries out the cake. Oil is 100% fat. It keeps the cake moist for days.
But the real MVP here is buttermilk. It breaks down the gluten in the flour, making the crumb tender.
I’ve been stuck in a snowstorm without buttermilk before. In a pinch, you can make a buttermilk substitute by adding a tablespoon of vinegar to a cup of milk. Let it sit for five minutes until it gets chunky. It works, but the real thick buttermilk is better. It gives the baking soda something to react with, which helps this heavy batter actually rise.
The Chocolate Itself
Finally, for the ganache (which we will get to), buy bars, not chips. Chocolate chips have stabilizers in them to help them keep their shape in cookies. We don’t want them to keep their shape. We want them to melt into a puddle of glory.
I tried melting a bag of cheap chips once for the frosting. It turned into a gritty, oily sludge. I had to throw the whole bowl away. It was heartbreaking. Spend the extra couple of bucks on a decent dark chocolate bar. You deserve it.

Step-by-Step Instructions for Baking Success
Alright, roll up your sleeves. We are about to make a mess, but it’s going to be a delicious mess. Baking this Matildas chocolate cake feels a bit like a science experiment gone right. I used to be intimidated by layer cakes—I thought they were only for people who owned fancy aprons and knew how to pipe frosting flowers. I was wrong.
This batter is incredibly forgiving, provided you follow a few weird rules.
The Mixing Strategy
First things first, get your dry ingredients in one bowl and your wet ingredients in another. It sounds basic, but I’ve tried to save dishes by dumping everything into one bowl at once. It was a disaster. You end up with pockets of flour that explode when you bite into the cake. Not cute.
Also, please use room temperature eggs. I know, I know. It’s annoying to remember to take them out of the fridge. I usually forget and end up putting them in a bowl of warm water for five minutes. If you use cold eggs, they seize up when they hit the oil, and your batter gets chunky. We want smooth, people.
When you combine the wet and dry, do not go crazy. I used to think I had to beat the batter into submission. Turns out, over-mixing activates the gluten and makes the cake chewy instead of tender. Just mix until the flour just disappears.
The Scary Part: The Hot Liquid
Here is the part that freaks everyone out. You have to pour that boiling water (or coffee) into the batter at the very end.
The batter will become extremely thin. It will look like soup. The first time I made this moist chocolate cake recipe, I thought I had ruined it. I almost threw it down the sink. I was standing there, staring at this chocolate puddle, thinking, “There is no way this bakes into a cake.”
But it does. Pour it slowly so you don’t scramble the eggs. That would be gross.
Pan Prep is Everything
Do not trust non-stick pans. They are liars. I learned this the hard way when half my cake stayed in the pan and the other half came out in crumbs.
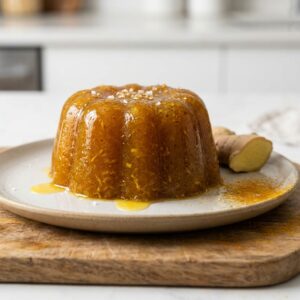
You need parchment paper hacks here. Trace the bottom of your pan on the paper, cut out the circle, and place it in the bottom. It is the only way to guarantee a clean release. I usually use two 9 inch cake pans for this recipe, though you can use three 8-inch ones if you want towering layers like in the movie.
The Patience Test
Pop them in the oven. Now, walk away. Don’t open the door every five minutes to check. Every time you open that door, heat escapes and your cake might sink in the middle. I’ve had many sunken cakes because I’m impatient.
When the timer goes off, use a toothpick. It shouldn’t come out clean. If it’s clean, you overbaked it. You want a few moist crumbs clinging to it.
And here is the hardest part: let them cool completely in the pans. If you try to dump them out while they are hot, they will fall apart. I tried to rush it once for a dinner party and ended up serving “chocolate cake debris” in a bowl. It tasted fine, but it wasn’t the vibe I was going for.

Creating the Glossy Fudge Ganache
The frosting is where dreams are made. And by dreams, I mean a sugar coma. We are not making a buttercream here. Buttercream is too fluffy and sweet for a Matildas chocolate cake. This beast requires dark chocolate ganache.
Ganache sounds fancy, like something you need a culinary degree for. But it is literally just two ingredients: chocolate and cream. That’s it. It is the easiest thing in the world, yet I managed to screw it up for years.
The Ratio Rule
The secret is the ratio. For a frosting that you can actually spread without it running off the cake like a waterfall, you need a 1:1 ratio by weight. That means if you use 8 ounces of chocolate, use 8 ounces of heavy whipping cream.
I once tried to eyeball it. I thought, “Eh, that looks like enough cream.” It was not. I ended up with a hard shell that cracked when I tried to cut it. It was like breaking into a vault. Use a kitchen scale if you have one. If not, just read the package sizes carefully.
Also, skip the milk chocolate here. It’s too sweet. You need semi sweet chocolate or even bitter-sweet to balance out the sugar in the cake layers.
The Melting Method (Don’t Burn It!)
Here is how you do it without crying. Chop your chocolate bars into small pieces. Put them in a heat-proof bowl. Heat your cream on the stove just until it starts to simmer. Do not let it boil over. Burnt cream smells like old socks.
Pour the hot cream over the chocolate. Now—and this is the most important part—do nothing.
Step away from the bowl. Let it sit for five minutes.
I used to start stirring immediately because I’m impatient. That cools the mixture down too fast and leaves you with lumps of unmelted chocolate. It’s gross. Just let the heat do the work.
Getting the Perfect Swoop
After five minutes, stir it gently starting from the center. It will look messy at first, then suddenly, it will turn into a glossy, dark pool of liquid gold.
Now you have a choice. You can pour it over the cake while it’s warm for a glazed look. But if you want that thick, fudgy frosting look from the movie, you have to let the ganache sit on the counter.
It takes a while. Maybe an hour or two. You want it to reach the consistency of peanut butter.
I usually check it every 20 minutes. One time I forgot about it, went to run errands, and came back to a solid block of chocolate. I had to microwave it for 10 seconds at a time to save it.
When it’s ready, slap it on the cake. Don’t worry about making it smooth. This cake is meant to look rustic. Use the back of a spoon to create those big, beautiful swoops. It makes the cake decorating look professional without actually trying too hard.

So there you have it. You have officially survived the baking process. If your kitchen looks like a bomb went off, you did it right. My counter is usually covered in cocoa dust for three days after I make this Matildas chocolate cake. It is just part of the charm.
This isn’t just a dessert; it is a commitment. But when you slice into it and see that dark, damp texture, you will know it was worth every dirty dish.
Storage and leftovers (If There Are Any)
Here is a little secret that most people don’t know: this cake is actually better the next day. I know, it is hard to wait. But if you put it in an airtight container or under a glass dome, the moisture redistributes. It becomes even fudgier. It transforms into the ultimate comfort food.
If you somehow have leftovers—which has never happened in my house, but theoretically it could—it keeps at room temperature for about three days. After that, put it in the fridge. But be warned: cold chocolate cake is solid. You will need to let it sit out for an hour before eating it, or zap it in the microwave for ten seconds to get that molten chocolate vibe back.
I also like freezing cake layers if I’m baking ahead of time. Wrap them in plastic wrap twice, then foil. They stay perfect for a month. It is a lifesaver for holiday prep or just weekend baking when you want to get ahead.
Share the Love
This cake is heavy, rich, and meant to be shared. It is the perfect centerpiece for a birthday or just a random Tuesday when you need a pick-me-up. Don’t be scared of the steps. Just remember: hot coffee, good cocoa, and patience with the cooling.
If you bake this, please don’t eat the whole thing yourself (or do, I won’t judge, Bruce Bogtrotter style).
If you loved this recipe and want to save it for your next sugar craving, pin this to your favorite dessert board on Pinterest! It helps me out, and it saves you from scrolling through your history frantically looking for “that one chocolate cake recipe” six months from now.
Go enjoy your sweet treats. You earned it.