I still remember the first time I brought a tray of these sliders to a neighborhood potluck; I was actually nervous because I had slightly overcooked the bacon. But let me tell you, that pan was empty in five minutes flat! There is a reason they call these “crack” breakfast sliders—you simply cannot eat just one. They are the perfect storm of salty, sweet, and cheesy flavors that just work. Did you know that savory breakfasts are shown to keep you fuller longer than sweet ones? Well, this recipe gives you the best of both worlds thanks to that maple glaze. I’ve messed this up a few times by using the wrong cheese or cheap rolls, but I’ve finally dialed in the method. Let’s get cooking!
 1")
Essential Ingredients for the Perfect Slider
Look, I used to think that a slider was just a slider and you could throw whatever leftovers were in the fridge onto a bun. I learned the hard way that is simply not true when I tried to use leftover hot dog buns for this recipe once. It was a total disaster and my kids still make fun of me for it. Getting the ingredients right is half the battle here. If you buy the wrong stuff, you end up with a soggy, sad mess instead of that savory breakfast masterpiece we are aiming for.
The Bread: Why Brand Matters
I am not usually a brand snob, but for crack breakfast sliders, you really need King’s Hawaiian rolls. I tried a generic store brand “sweet roll” a few months ago to save two dollars. Big mistake. The generic rolls were too airy and completely dissolved once the egg and butter hit them. The specific texture of the Hawaiian rolls holds up to the weight of the fillings. Plus, that little bit of sweetness is crucial to balance out the salty bacon. If you can’t find them, look for a brioche slider bun, but honestly, just hunt for the orange package.
The Protein: Bacon vs. Sausage
I am a bacon person, through and through. However, cooking bacon for a crowd is annoying because of the grease splatter. My trick? I bake the crispy bacon in the oven at 400 degrees on a foil-lined sheet while I prep the eggs. It comes out perfectly flat and crunchy every time.
If you prefer sausage, use the flat patties rather than crumbles. Crumbles fall out every time you take a bite, and it drives me crazy. I have also used thin-sliced deli ham when I was in a rush. It’s good, but it doesn’t give you that same “crack” factor that the salty bacon does.
Cheese Selection 101
Please, I am begging you, do not use the pre-shredded cheese in a bag for this. I know it saves time. I have done it plenty of times when I was feeling lazy. But that stuff is coated in potato starch to keep it from clumping, which means it never melts into that gooey layer you want.
Grab a block of sharp cheddar and grate it yourself. It takes two minutes. Sharp cheddar cuts through the rich butter glaze perfectly. If you want maximum meltiness, you could mix in a slice or two of American cheese, but stick to cheddar for the main flavor.
The Secret Glaze Components
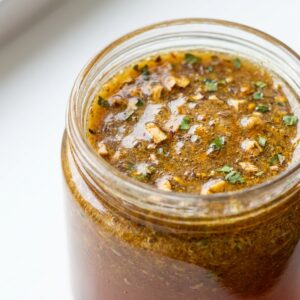
This is where the magic happens. You might think mixing brown sugar with garlic powder sounds gross. I thought so too until I tasted it. You need melted butter, brown sugar, a dash of Worcestershire sauce, and poppy seeds (if you have them).
The Worcestershire sauce is the secret weapon. It adds that umami flavor that makes people wonder why these taste so good. I’ve forgotten it before, and the sliders just tasted like dessert. Don’t skip it. Also, salted butter is better here than unsalted; we want that salty-sweet contrast.
 2")
How to Layer and Assemble Your Breakfast Sliders
Assembling these sliders used to be a total hot mess for me. I used to try to build them like individual sandwiches, ripping the rolls apart first and then trying to stuff eggs into twelve tiny buns. It took forever, and half the filling ended up on the floor. I finally learned the “slab method,” and it is honestly a game changer for any sheet pan breakfast.
The Slab Cut Technique
Do not separate the rolls! I cannot stress this enough. Take the entire package of Hawaiian sweet rolls out of the cardboard and keep them attached to each other. You want to grab a large serrated bread knife—the biggest one you have.
Slice the entire block horizontally right through the middle. You should end up with one giant rectangle top and one giant rectangle bottom. I’ve messed this up by using a dull knife and squishing the bread flat, so make sure your knife is sharp. If you cut it unevenly, you’ll have thin bottoms that get soggy fast.
The Egg Situation
Here is where most people ruin this recipe. When you cook your scrambled eggs, you have to undercook them. Seriously, take them off the heat while they still look a little wet and runny.
I learned this after serving rubbery sliders to my in-laws. It was embarrassing. Remember, these go back into the hot oven for twenty minutes. If the eggs are fully cooked in the pan, they will be tough by the time the cheese melts. Keep them soft and fluffy. It makes a huge difference in the final texture.
Building the Layers
There is a specific architecture to preventing soggy bread. You can’t just throw everything on there willy-nilly.
- The Cheese Barrier: I always put a layer of cheese directly on the bottom slab of bread first. This creates a seal so the grease from the meat and eggs doesn’t soak into the bun.
- ** The Meat:** Lay your cooked bacon or sausage on top of that bottom cheese layer.
- The Eggs: Spread your soft scrambled eggs evenly over the meat.
- More Cheese: Top the eggs with the rest of your cheddar. This acts like glue to hold the top bun on.
The Final Top
Place the top slab of rolls back on over the cheese. It might look like a towering monster right now, but it will squish down as it bakes. This is the point where I usually realize I forgot to grease the pan, so don’t be like me—spray your baking dish before you even start.
Once assembled, you are ready for the glaze. Don’t worry if the breakfast sliders look a little messy or uneven. Once that butter hits them, nobody is going to care about the aesthetics. They just want to eat.
 3")
Baking Tips for Melty, Gooey Goodness
I used to think baking was just “set it and forget it,” but these sliders humbled me real quick. The first time I made these, I shoved the pan in the oven and walked away to drink coffee. Twenty minutes later, the smoke alarm was going off because the sugar in the glaze had scorched the tops of the buns to a crisp black. Meanwhile, the cheese in the middle was still a solid block. It was a tragedy. Baking these oven baked sliders is actually a two-step process if you want them perfect.
The Foil Shield Strategy
Because the glaze has brown sugar in it, it burns way faster than the bread cooks. You have to protect the tops. I learned to cover the baking dish tightly with aluminum foil for the first 10 to 15 minutes of baking.
This traps the steam inside, which helps melt the cheese thoroughly without ruining your beautiful rolls. It creates a little sauna for the Hawaiian roll breakfast sliders. If you skip this, you’re gambling with burnt sugar, and nobody wants that bitter taste for breakfast.
The Crisping Phase
Once that cheese is melted—you can peek under the foil to check—it’s time to take the cover off. This is the fun part. I usually bake them uncovered for another 3 to 5 minutes.
You want the tops to get slightly golden and the savory glaze recipe to bubble up and get sticky. Keep a close eye on them during this stage! I literally sit on the kitchen floor and watch through the oven window because they go from “perfect” to “burnt” in about sixty seconds.
The Hardest Part: Waiting
This is the step everyone ignores, and it ruins the presentation every time. When you pull that hot pan out of the oven, do not cut into it immediately. I know it smells amazing. I know you are hungry.
But if you cut them right now, the gooey cheese will slide right out, and the layers will separate. It’s a hot mess. Let the sliders rest on the counter for about 5 to 10 minutes. This allows the cheese to set just enough to hold everything together.
Temperature Matters
I’ve experimented with different oven temps, and 350°F is the sweet spot. I tried 400°F once to speed things up, and the bottoms burned before the middle was hot. Low and slow is the way to go here.
Also, if you are making make ahead breakfast sliders and baking them from the fridge, you’ll need to add an extra 5-10 minutes to the covered baking time. Cold glass pans take a while to heat up. Just make sure the center is hot before you unleash them on your guests.
 4")
Variations to Spice Up Your Morning
I love the classic bacon and cheddar version of these sliders. I really do. But sometimes, you just get bored of eating the same thing every single Sunday. I started experimenting with different flavors a few years ago because my husband complained that we were in a “breakfast rut.” I took that as a challenge. Since then, I’ve ruined a few batches (blue cheese was a terrible idea, don’t do it), but I’ve also found some combinations that honestly might be better than the original.
The Jalapeño Wake-Up Call
If you like a little heat to jumpstart your metabolism, this variation is for you. I call it the “Spicy Kick.” I made the mistake once of using fresh jalapeños without removing the seeds and membranes. I served them to my parents, and my poor dad turned bright red and had to drink a gallon of milk. It was funny, but I felt bad.
Now, I use pickled jalapeño slices. They have that nice tang without blowing your head off. You can layer them right on top of the cheese inside the slider. If you want even more heat, whisk a teaspoon of hot sauce into the butter glaze. It soaks into the bread and makes these spicy breakfast sliders absolutely addictive. Just warn your guests before they take a bite!
Everything Bagel Magic
I was obsessed with everything bagel seasoning when it first became a trend. I put it on avocado toast, eggs, you name it. One day, I ran out of poppy seeds for the glaze and decided to sprinkle this seasoning on top instead. It was a total game changer.
The garlic, onion, and sesame seeds in the mix add this incredible savory crunch to the top of the soft rolls. It makes them taste like a fancy bakery item. Just be careful not to burn the garlic bits. Since I started doing this, I almost never go back to plain poppy seeds. It adds texture that the soft Hawaiian sweet rolls really need.
The Meat Lover’s Dream
Sometimes, three slices of bacon just isn’t enough. I have a teenage son who acts like he hasn’t eaten in weeks, so I created a “Meat Lovers” version just for him. I combine sausage breakfast sliders with the bacon version.
Here is the trick: do not just pile everything up in the middle or the slider will be six inches tall and impossible to eat. I do a layer of thin ham, then the sausage patty, and crumble the bacon on top of the eggs. It is a hearty breakfast that will definitely require a nap afterwards. It’s heavy, greasy, and delicious. If you are feeding a group of guys watching football, this is the one to make.
A Note on Swaps
You can really throw whatever you want in these. I’ve used Swiss cheese and mushrooms for a more “adult” flavor, and it was pretty good. The only rule is to avoid watery vegetables like fresh tomatoes or spinach inside the slider. They release water when they bake and make the bottom bun mushy. Nobody likes soggy bread. Stick to cooked meats, cheeses, and pickled veggies, and you can’t really go wrong. These loaded breakfast sliders are forgiving as long as you keep the moisture in check.
 5")
Why These Will Become a Regular in Your House
Look, I know we all try to eat healthy most of the time. But sometimes you just need comfort food breakfast that feeds the soul. These sliders are definitely that. They are messy, rich, and totally worth every calorie. I honestly don’t know what I did for big family gatherings before I found this recipe. I probably just stressed out over pancakes that got cold too fast.
These sliders changed my hosting game completely. You can prep them while drinking your coffee, throw them in the oven, and actually sit down with your guests. No more standing by the stove flipping eggs while everyone else eats. That alone makes this the best brunch recipe in my book.
A Final Tip on Leftovers
I will be honest with you—you probably won’t have leftovers. I made a double batch last Christmas for eight people, and there wasn’t a crumb left. But, if you do have a few survivors, they reheat okay.
Just don’t microwave them for too long or the bread gets rubbery. I like to wrap the warm breakfast sandwiches in foil and pop them back in the toaster oven for a few minutes. It crisps the bottom back up. They are definitely best fresh, though, when that melted cheddar cheese is still gooey.
Let’s Be Friends!
I usually serve these with a side of fruit salad just to make myself feel better about the amount of butter I am consuming. It’s all about balance, right? If you are planning a holiday brunch menu, these need to be front and center.
One last thing—if you make these, take a picture before you put them on the table. Seriously. They vanish so fast you won’t get another chance. I hope your family loves these as much as mine does.
If this recipe saved your morning, do me a huge favor. Pin this image to your Breakfast or Brunch board on Pinterest! It helps other tired parents find good food, and it helps me keep the blog running. Happy cooking, friends!