Have you ever craved the rich, buttery taste of a pecan pie but dreaded the thought of making a crust from scratch? I have been there! I remember staring at a bag of pecans in my pantry, exhausted after work, wanting something sweet but refusing to pull out the rolling pin. That is exactly when I discovered the magic of this pecan pie dump cake. It is a total lifesaver. Did you know that “dump cakes” have been a staple American quick-dessert since the 1980s? It’s true! This recipe takes all that complex flavor and simplifies it into a toss-and-bake miracle. You are going to love how your kitchen smells. Let’s get baking!

What Exactly is a Dump Cake?
Honestly, the first time I heard the name “dump cake,” I wrinkled my nose a little bit. It doesn’t exactly sound like a five-star dessert, does it? But let me tell you, I was dead wrong. I remember standing in my kitchen about ten years ago, covered in flour from a failed attempt at a complicated layer cake, feeling totally defeated. A neighbor popped by and told me to stop overcomplicating things and just “dump it.”
That is the beauty of this dessert.
The Art of Doing Nothing
A dump cake is exactly what it sounds like. You literally dump the ingredients into a baking dish and shove it in the oven. There are no mixing bowls to wash. You don’t need a whisk or an electric mixer. For a pecan pie dump cake, you generally layer your ingredients: pecans, the gooey filling, cake mix, and butter.
When I first tried this, I had a panic moment. My instinct as a baker was to stir everything together.
Don’t Touch That Spoon!
Here is a lesson I learned the hard way so you don’t have to. The biggest mistake you can make with a dump cake is stirring. I did this once because I was worried the yellow cake mix would stay powdery.
The result? It was a weird, gummy mess that didn’t bake right.
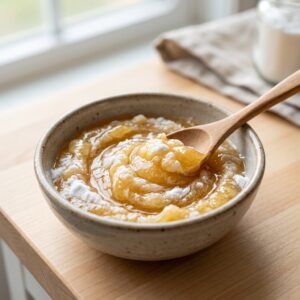
You have to trust the process. The moisture from the bottom layer and the melted butter on top work together to cook the dry mix in the middle. It transforms into this incredible crust that is somewhere between a cobbler and a crisp. It is not fluffy like a traditional birthday cake, and it’s not quite a pie either. It is its own delicious category of dessert.
Why It Saves My Holidays
I used to stress out during Thanksgiving, trying to roll out perfect pie crusts. Half the time they would crack, and I’d end up almost crying over spilled milk—literally. Then I switched to making this pecan pie dump cake.
It gives you all that rich, caramelized flavor of a pecan pie without the headache of dough.
Plus, it feeds a crowd way better than a standard 9-inch pie. You bake it in a 9×13 pan, so there is plenty for everyone. It’s a total game-changer for potlucks or when you just need a sweet treat on a Tuesday night.
A Quick Texture Warning
If you have never had one before, don’t expect a sponge cake. The texture is denser and gooier.
The top gets crunchy and buttery, while the bottom stays soft and rich. It is meant to be scooped with a big spoon, not sliced perfectly like a wedding cake. And if you see a tiny bit of dry mix on top after baking? That is totally fine. It adds a nice little crunch.
So, put away the mixer and embrace the lazy baking life. Your dishwasher will thank you!

Ingredients You’ll Need for Pecan Pie Dump Cake
When I first started baking, I used to think that “fancy” meant buying the most expensive ingredients on the shelf. I remember standing in the baking aisle for twenty minutes, debating between two bags of flour that looked exactly the same. But here is the truth I have learned over the years: for a pecan pie dump cake, you don’t need fancy. You just need the right stuff.
This recipe is forgiving, but I have definitely messed it up a few times by trying to cut corners.
The Star of the Show: Pecans
Okay, let’s talk about the nuts. You cannot make this without them, obviously.
I usually grab a big bag of pecan halves. Some people like chopped pecans because they are easier to eat, but I think the halves look prettier when the cake comes out of the oven. It gives it that rustic look.
One time, I tried to use walnuts because that is what I had in the cupboard. Bad idea. It tasted okay, I guess, but it just wasn’t the same vibe. It didn’t have that classic pecan pie flavor I was craving. If you can, toast them lightly in a pan before you start. It brings out a nuttiness that is just unreal. But if you are in a rush (like I usually am), raw pecans work fine too.
The Cake Mix Dilemma
You might be wondering which cake mix to grab.
I almost always reach for a standard box of yellow cake mix. It has a neutral, buttery flavor that doesn’t overpower the filling. I have seen some folks on Pinterest swear by white cake mix, but I find it a little too bland for this recipe.
A few years ago, I accidentally bought “Butter Pecan” cake mix. I decided to roll with it, and oh my gosh, it was intense. It was good, but it was very rich. If you have a serious sweet tooth, give that a shot. But for a classic taste, stick to the yellow box. And please, do not follow the instructions on the back of the box! We are using the dry mix only.
Butter: Salted or Unsalted?
This is a hill I am willing to die on. Use salted butter.
I know, I know. Every baking book tells you to use unsalted butter so you can “control the sodium.” But in a dump cake, you have a lot of sugar going on. You have the cake mix, the corn syrup, and the sugar. You need that salt to cut through the sweetness.
I made the mistake of using margarine once because it was cheaper. The result? A greasy, oily disaster that refused to crisp up properly. The top looked soggy, and I was so embarrassed I almost threw it out before my guests arrived. Learn from my fail: buy the real butter. You will need about a stick and a half to cover the top completely.
The Gooey Binding Agents
To get that pie filling texture, you need corn syrup and brown sugar.
I prefer dark corn syrup because it has a deeper molasses flavor, but light corn syrup works if that is all you have. I have tried substituting honey once when I was out of syrup. It was… interesting. Not bad, but it definitely tasted like honey cake, not pecan pie.
Also, make sure your eggs are at room temperature. I used to think this was a myth, but cold eggs really do seize up the butter mixture when you are whisking the filling. Just set them on the counter while you prep the pan.
A Note on Extras
If you want to feel fancy, toss in a splash of vanilla extract or a pinch of cinnamon.
I usually add a little cinnamon to the filling. It makes the kitchen smell like Christmas, even if it is the middle of July. Just don’t go overboard, or you’ll lose the pecan flavor.
So, check your pantry before you start. Having the right ingredients ready to go makes the whole process so much faster.

Step-by-Step Instructions for Success
I am a stickler for following rules in baking, usually. But with this recipe, it feels a little bit like cheating because it is so simple. However, do not get too cocky! I have ruined a perfectly good pecan pie dump cake by rushing through these steps.
It really comes down to the layering. If you mess up the order, you end up with a weird, soupy casserole instead of a cake.
Prep Your Battle Station
First things first, get that oven preheated to 350°F.
While it is heating up, grab your trusty 9×13 baking dish. Please, for the love of all things sweet, grease the pan! I use a generous amount of non-stick spray. One Thanksgiving, I forgot this step, and I literally spent forty-five minutes scraping caramelized sugar off my favorite glass dish. It was a nightmare.
The Layering Strategy
Here is exactly how you need to build this bad boy.
1. The Base: Dump your pecans into the bottom of the greased pan. Spread them out so they are covering the bottom evenly. You don’t want one person getting all the nuts and someone else getting none.
2. The Filling: In a separate bowl, mix your eggs, corn syrup, sugar, and vanilla. Whisk it until it is smooth. Pour this mixture right over the pecans.
3. The Dry Mix: Take your box of yellow cake mix and sprinkle it over the wet layer. Do not dump it all in one spot! Shake the box gently as you move it over the pan to get an even layer of dust.
4. The Butter: This is the most controversial part. You need to slice your butter into thin squares. Place them all over the dry cake mix, like you are tiling a floor.
To Stir or Not to Stir?
I will say this one more time because it is important: Do not stir.
If you mix the dry cake powder with the wet filling underneath, you ruin the magic. The butter needs to melt down through the cake mix to create that crisp, cobbler-like topping. Just trust the process.
Baking and Patience
Pop it in the oven for about 45 to 50 minutes.
You will know it is done when the top is golden brown and the edges are bubbling like crazy. It smells absolutely heavenly. Now, here is the hardest part: let it sit.
If you try to cut into it right away, it will be a runny mess. Let it cool for at least 20 minutes so the filling can set up. I learned this the hard way and burned my tongue so bad I couldn’t taste my dinner!

Expert Tips for the Perfect Crust
You know that feeling when you bite into a piece of cake and get a mouthful of dry, dusty powder? It is the absolute worst. It makes you want to cough, and it totally ruins the vibe of the dessert. With a pecan pie dump cake, the crust is the trickiest part because we aren’t mixing it.
I have had my fair share of failures where the top looked more like a sandbox than a cake.
But over the years, I have figured out a few tricks to make sure that crust comes out golden, crunchy, and fully cooked every single time. It just takes a little bit of attention to detail.
The Butter Patchwork
I mentioned earlier that I slice my butter instead of melting it. Here is why.
When you melt the butter and pour it over the cake mix, it tends to pool in certain spots. You end up with these delicious, buttery craters, but then you have islands of dry mix that never get touched by the moisture. It is annoying.
I take the time to slice the butter into thin squares, maybe a quarter-inch thick. I lay them out over the dry mix like I am tiling a bathroom floor. It takes a few extra minutes, but it covers way more surface area. As it melts in the oven, it spreads out evenly. It creates a consistent, crunchy topping that is to die for.
The “Dry Spot” Emergency Fix
Okay, so you followed the rules, but you still see white powder halfway through baking. Don’t panic.
I usually turn on the oven light and peek in after about 30 minutes. If I see a spot of dry yellow cake mix that looks like it isn’t going to hydrate, I cheat a little.
I open the oven and carefully place a tiny extra pat of butter right on top of the dry spot. Or, if I am trying to be slightly healthier (which is a joke with this recipe), I give that specific spot a quick spritz with cooking spray. It helps the powder absorb into the rest of the crust.
Toast Your Pecans First
This is an extra step, and I know we are all about “dumping” and being done. But if you have five minutes, toast your pecans in a dry skillet before you put them in the pan.
I skipped this for years. Then one day, I toasted them because I was feeling ambitious. The difference was huge.
Toasting releases the oils in the nuts and makes them crunchier. It helps them stand up to the gooey syrup without getting soggy. Just don’t burn them! I have definitely walked away to yell at the dog and came back to the smell of burnt nuts. Watch them like a hawk.
The Waiting Game
The crust needs time to harden after you take it out of the oven.
When you first pull the pan out, the top might feel a little soft. That is normal. As it cools down to room temperature, that sugar and butter combination crisps up. If you cover it with foil while it is still hot, you will trap the steam and make the crust soggy.
Leave it uncovered on the counter. Let it breathe. It is worth the wait, I promise.

Serving Suggestions and Storage
I have to be honest with you. There have been times when I didn’t even bother with a plate. I just grabbed a spoon and ate this pecan pie dump cake standing right over the stove. It is that good.
But if you are actually serving this to guests, you probably want to be a little more civilized than I am.
Presentation might not be the strong suit of a dump cake—it looks a bit messy—but you can dress it up.
The Perfect Pairing
You cannot serve this cake by itself. It is practically a crime.
Because the filling is so sweet and rich, you need something cool and creamy to balance it out. My go-to is always a big scoop of high-quality vanilla ice cream.
When you put the cold ice cream on the warm cake, it starts to melt into the cracks. It creates this creamy sauce that mixes with the caramel pecan filling. It is pure magic.
If you aren’t an ice cream fan, fresh whipped cream works too. Just make sure it isn’t too sweet. I like to whip up some heavy cream with just a tiny drop of vanilla and no sugar. It cuts through the richness of the dessert perfectly.
The “Morning After” Breakfast
Here is a secret: this cake tastes even better the next day.
The flavors have time to meld together, and the crust softens just a tiny bit. I may or may not have eaten leftovers with my coffee for breakfast. Don’t judge me!
But you have to store it right. Since there are eggs in the filling, I don’t like to leave it on the counter for more than a few hours.
Cover the pan tightly with plastic wrap or aluminum foil. Pop it in the fridge. It will stay good for about three to four days. After that, the pecans start to get a little soggy, and the texture changes.
Reheating Rules
If you are eating leftovers, you have a choice to make.
You can eat it cold, right out of the fridge. It is firmer, almost like a dense candy bar. I actually really like it this way.
But if you want that gooey experience again, you need to warm it up.
Do not put the whole pan back in the oven unless you are reheating the entire thing for a crowd. Just take a square and zap it in the microwave for about 20 seconds. Be careful, though. The sugar in the filling gets hot really fast.
If you want the crust to be crunchy again, use a toaster oven or an air fryer for a few minutes. The microwave tends to make the cake part a little soft.
Can You Freeze It?
Yes, you can!
If you have way too much left over, cut it into individual squares. Wrap each one in plastic wrap, and then put them all in a freezer bag. They will keep for a couple of months.
When the craving hits, just pull one out and let it thaw on the counter. It is the perfect emergency treat for a bad day.

I hope you are feeling inspired to get in the kitchen and make a mess!
Well, actually, with this recipe, you won’t make much of a mess at all. That is the beauty of it. This pecan pie dump cake has saved me so many times when I needed a homemade dessert but had zero energy to bake.
It brings all the comfort of a holiday pie with the ease of a boxed mix.
If you try this recipe, please let me know how it turned out! I love hearing about your baking adventures (and misadventures). Did you add chocolate chips? Did you use extra pecans? Tell me everything.
And if you loved this easy recipe, please pin it to your “Desserts” board on Pinterest! It helps other busy bakers find it, and it helps me keep sharing these tips with you.
Happy baking, my friends!